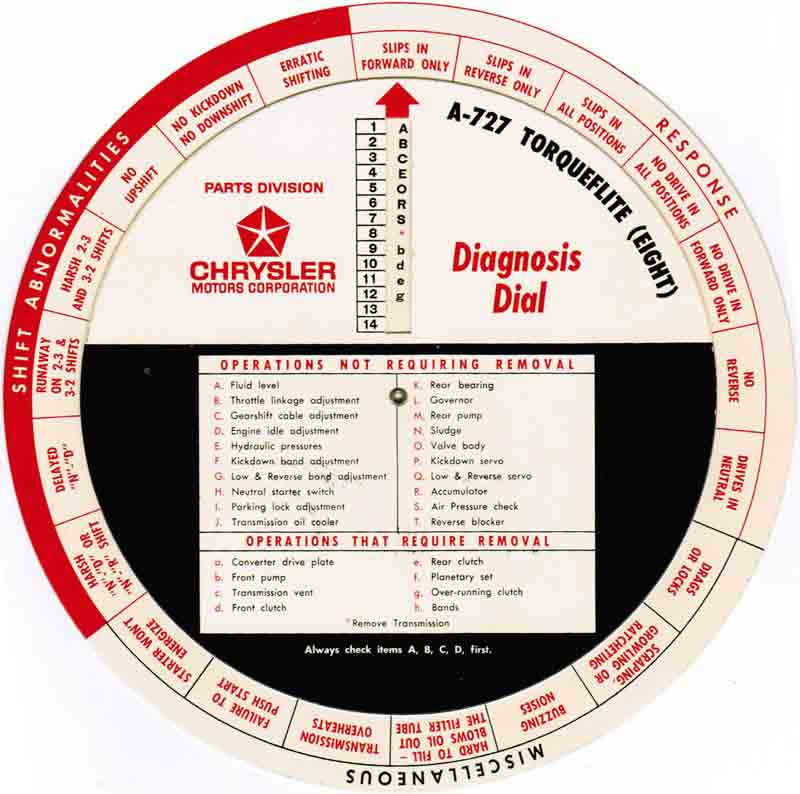
The script below mimics the 1963 wheel dial pictured above (click to enlarge). Click on the problem description and follow the troubleshooting steps in order. The dial was created for cable-shift aluminum Torqueflites, like those used in Max Wedges and A864/A990 Race Hemis. The steps should mostly apply to any A-727 or A-904 Torqueflite transmission.
|
|
Fluid level
Throttle linkage adjustment
Gearshift cable adjustment
Engine idle adjustment
-
EXPLANATION OF CHECK ITEMS
• FLUID LEVEL -- The transmission fluid level should be at the "full" mark on the dipstick when the transmission is at full operating temperature, with the engine idling and the transmission in neutral. Use only type "A" Suffix "A" fluid.
• THROTTLE LINKAGE ADJUSTMENT -- Adjust to specifications.
• GEARSHIFT CABLE ADJUSTMENT -- Adjust to specifications.
• ENGINE IDLE ADJUSTMENT -- Adjust to 475-500 rpm. Make sure that the ignition system and fuel system are functioning properly.
• HYDRAULIC PRESSURES -- Determine if the following four pressures are within recommended limits:
(1) Line (accumulator) pressure
(2) Front servo release pressure
(3) Lubrication (cooler return) pressure and
(4) Reverse line(rear servo apply) pressure
• KICKDOWN BAND ADJUSTMENT -- Loosen the lock nut, tighten the adjusting screw to 72 inch-pounds torque and back it off the specified number of turns.
• LOW & REVERSE BAND ADJUSTMENT -- Loosen the lock nut, tighten the adjusting screw to 72 inch-pounds torque and back it off the specified number of turns. Tighten the lock nut.
• NEUTRAL STARTER SWITCH -- Examine the wire and connections. Test the switch. Make sure that the manual level grounds the switch when the neutral button is engaged.
• PARKING LOCK ADJUSTMENT -- Adjust to specifications.
• TRANSMISSION OIL COOLER -- Check lines and cooler for leaks or obstructions.
• REAR BEARING -- Remove extension and examine output shaft rear bearing and seal for excessive wear. Replace if necessary.
• GOVERNOR -- Disassemble completely and clean all parts. Inspect inner and outer weights, valve, and body for burrs. Check clearance for governor shaft in output shaft hole. Check seal rings.
• REAR PUMP -- Clean and inspect the assembly for side and diametrical clearance. Examine rotors and housing for wear.
• SLUDGE -- Drain transmission and remove pan and screen. Clean and inspect screen for distortion. Sheet metal of screen should be flat, to seat against transfer plate when installed. If there is evidence of excessive sludge, the entire transmission must be overhauled, the converter and cooler must be flushed, and the filter must be replaced.
• VALVE BODY -- Disassemble and clean all parts thoroughly. Inspect valves for burrs, springs for collapsed coils and bores for scratches. Examine mating surfaces for burrs or scratches. Reassemble and install, torquing all screws and bolts to specifications.
• KICKDOWN SERVO -- Clean and inspect for broken seal rings, scratched or out of round cylinder bore, and damage to the linkage or springs.
• LOW & REVERSE SERVO -- Clean and inspect for damaged seal, scratched or out of round cylinder bore, and damage to the linkage or springs.
• ACCUMULATOR -- Clean and inspect for broken seal rings, scratched or out of round cylinder bore, and damage to the spring.
• AIR PRESSURE CHECK -- The clutch and servo circuits may be checked by applying air pressure to their respective passages in the case, with the valve body assembly removed.
• REVERSE BLOCKER -- Clean and inspect valve and bore for burrs and scratches.
• CONVERTER DRIVE PLATE -- Examine the flexible converter drive plate for flatness. If it is distorted or failed, replace with a new plate, torquing all bolts to specifications. If a drive plate failure is is repeated, check engine-to-transmission alignment and correct with offset dowels.
• FRONT PUMP -- Clean and inspect for side and diametrical clearance. Examine rotors for scoring, and the seal and bushing for wear. Inspect the pump housing and reaction shaft support mating surfaces for flatness and smoothness.
• TRANSMISSION VENT -- Make sure there is no obstruction in the transmission vent and make sure that the external shield and internal baffle are installed.
• FRONT CLUTCH -- Clean and inspect all parts, examining retainer and piston for scores and scratches, discs and plates for wear, the return springs for proper spacing and number, and the seals and passages for leakage. The vent check ball in the retainer must seat air tight and operate freely.
• REAR CLUTCH -- Clean and inspect all parts, examining retainer and piston for scores and scratches, discs and plates for wear, the return spring (Belleville) for distortion, and the seal rings for for damage. The vent check ball in the piston must seat air tight and operate freely.
• PLANETARY SET -- Clean and inspect annulus gear, planet pinion carrier assembly and sun gear for worn thrust washers, nicked or rough gear teeth, loose lock pins and excessive pinion clearance. Examine the bushings in the sun gear for excessive wear.
• OVER-RUNNING CLUTCH -- Clean and inspect over-running clutch parts for brinnelled rollers and/or cam, and improperly assembled rollers or springs. Check for collapsed springs and bent spring retainer tabs. Check cam set screw for tightness.
• BANDS -- Examine kickdown band and low reverse for worn lining material.
CHRYSLER MOTORS CORPORATION
PARTS DIVISION
BOX 1718
DETROIT 31, MICHIGAN
Mar. 1963